A friend of mine — a genuinely talented home cook who can nail beef Wellington without blinking — called me last month in mild despair. Her sourdough starter, which she’d been nursing for two weeks, had gone gray, smelled like nail polish remover, and was sitting completely flat. She was ready to pour it down the drain. Sound familiar?
I’ve been down that exact road. Three failed starters over two years before something finally clicked. And what I’ve learned is that most beginner guides skip the why — they give you the steps without the logic, so when something goes sideways (and it will), you have no idea what lever to pull. Let’s fix that together.
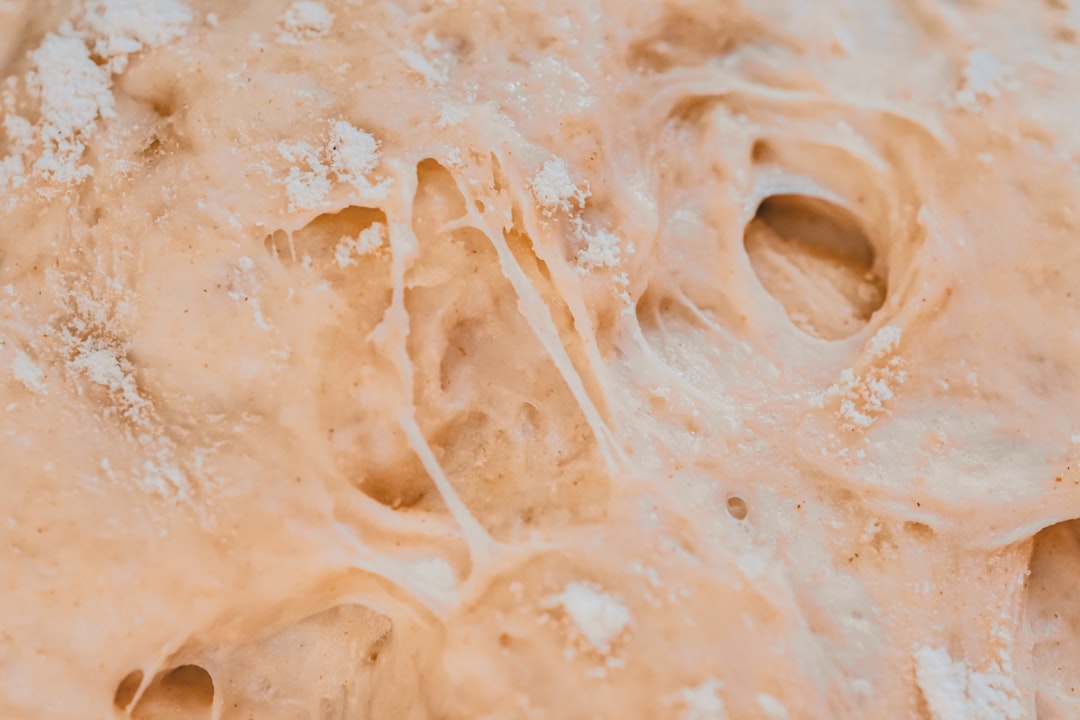
What’s Actually Happening Inside That Jar
Before we talk ratios and schedules, let’s get one thing straight: a sourdough starter is a living ecosystem, not a recipe. You’re cultivating a symbiotic culture of wild yeast (Saccharomyces cerevisiae and its cousins) alongside lactic acid bacteria (LAB) — primarily Lactobacillus strains. The yeast produces CO₂ (the rise), and the bacteria produce lactic and acetic acid (the flavor and preservation).
When your starter smells like acetone or nail polish remover, that’s hooch — a layer of alcohol produced when the yeast runs out of food. It’s not dead; it’s starving. That’s the single most common misdiagnosis beginners make. Gray liquid on top = feed it now, don’t dump it.
The Numbers That Actually Matter
Most starter guides throw ratios at you without context. Here’s what I’ve found works, with the reasoning attached:
- 1:1:1 ratio (starter : flour : water by weight) — This is the standard maintenance ratio. 20g starter + 20g flour + 20g water. It gives you a predictable 8–12 hour peak cycle at room temperature (around 21–23°C / 70–74°F).
- 1:5:5 ratio — Use this when your starter is over-fermenting (peaking and collapsing before you can use it). More food = slower fermentation. Great for overnight schedules.
- Temperature is your real timer — At 18°C (65°F), expect a 14–16 hour peak. At 27°C (80°F), it can peak in as little as 4–6 hours. Your schedule has to match your kitchen, not a blog post written in a different climate.
- Hydration matters for texture — 100% hydration (equal weights flour and water) gives a thick, pourable batter. Drop to 80% for a stiffer culture that produces more acetic acid (sharper flavor). Bread bakers in San Francisco famously favor stiffer starters for that iconic tang.
- Whole wheat or rye flour to jumpstart — These contain more wild yeast and nutrients than white flour. Even substituting 10–20% of your feeding flour with whole rye can dramatically accelerate a sluggish starter.
The Day-by-Day Reality (Not the Idealized Version)
Here’s the honest timeline, including the parts most guides gloss over:
Days 1–2: Mix 50g whole wheat flour + 50g unchlorinated water (filtered or left out overnight). Cover loosely. You may see nothing. That’s fine. Resist the urge to feed again — you’ll dilute the bacteria before they’ve had a chance to colonize.
Days 3–4: Things often get weird here. You might see explosive bubbling followed by a foul smell — almost like vomit or cheese gone wrong. This is leuconostoc bacteria taking over temporarily. They’re not dangerous, but they’re not the culture you want. Do not panic. Do not dump it. Discard all but 50g and feed 1:1:1. The pH drop from your LAB will outcompete leuconostoc within 24–48 hours.
Days 5–7: A stable, pleasant sour smell (like yogurt or mild vinegar) and consistent rise-and-fall cycles should appear. The float test — dropping a small blob of starter in water to see if it floats — works here as a rough readiness check, though it’s more of a guideline than a law.
Days 8–14: True stability. Your starter should double within 4–8 hours of feeding consistently before you use it in bread. If it’s still sluggish past day 10, your water is likely chlorinated or your kitchen is too cold.
What the Research and Baking Community Actually Say
The work of microbiologist Rob Dunn’s Global Sourdough Project (which analyzed starters from 18 countries) found that local microbial environments matter less than previously thought — your hands, your flour, and your feeding schedule shape the culture more than ambient air. This is good news: you don’t need to live near a bay or a forest to grow a great starter.
Meanwhile, King Arthur Baking Company’s test kitchen — arguably the most data-driven home baking resource available in 2025 — recommends using AP flour with 10% rye by weight as the gold standard for reliable starters. Their published research shows this blend accelerates colonization by roughly 30% compared to white flour alone.
For temperature control without buying specialty equipment, the proofing setting on a standard oven with the light on typically holds around 27°C (80°F) — perfect for an accelerated starter schedule. Several bakers in the r/Sourdough community (a genuinely useful resource with over 700,000 members as of 2025) use a simple seedling heat mat set to low as an even more consistent alternative, costing around $15–20.

The Most Common Failure Points (And Their Fixes)
Let’s be specific, because vague advice is useless when you’re staring at a flat jar:
- Starter won’t rise at all after 7 days → Check water source first. Tap water with high chlorine content can suppress bacterial growth. Switch to filtered water or let tap water sit uncovered for 2 hours before using.
- Pink or orange streaks → Contamination, usually from serratia marcescens bacteria. This is the rare case where you actually should discard and start over. Sterilize your jar with boiling water first.
- Smells like alcohol/nail polish remover → Hooch. Feed immediately. If it’s a persistent problem, increase feeding frequency or switch to a higher ratio (1:2:2 or 1:5:5).
- Rises well but bread is dense → Your starter may be past peak when you use it. Use it at peak (domed top, maximum volume) not after it collapses. A rubber band around the jar at feeding time is the simplest tracking tool.
- Too sour, not sour enough → Acetic acid (sharp sourness) develops in cooler, stiffer cultures with longer fermentation. Lactic acid (mild, yogurt-like) develops in warmer, wetter cultures. Adjust temperature and hydration to tune flavor.
Realistic Alternatives and Adaptations
If you’re genuinely time-constrained, a commercial yeast bridge is not cheating — it’s pragmatic. Add ¼ teaspoon of active dry yeast to your initial flour-water mix. It won’t be “true” wild sourdough from day one, but it creates enough CO₂ activity to drop the pH quickly, which helps wild yeast colonize faster. Think of it as training wheels you remove by week two.
Alternatively, if you just want the flavor without the commitment, long-fermented yeast bread — using 0.1% commercial yeast and a 12–18 hour cold proof — produces a surprisingly similar tang through the same lactic acid chemistry. No starter required. Kenjilopez-Alt of Serious Eats documented this process thoroughly, and it’s worth reading if sourdough maintenance feels like too much right now.
And if you do want a starter but not from scratch, many artisan bakeries — including local ones — will give or sell established starters. A 2-year-old starter from a bakery is metabolically more robust than a 10-day-old home culture. Check with your nearest sourdough-focused bakery; in 2025, this has become surprisingly common as bread culture has grown.
💬 Got a starter question or a failure story you can’t figure out? Drop it in the comments — sometimes the most useful troubleshooting happens when we compare notes. The variables in sourdough are real, but they’re all solvable once you know what to look for. Your next loaf is closer than you think.
📚 관련된 다른 글도 읽어 보세요
- 구글에도 안 나오는 국내 해안 절경 숨은 명소 7곳 + 실패 없는 방문 루트 [2026 최신]
- 방학 때 해외여행 패키지 120만원 아꼈다: 2026 가족여행 비용 절약 완전 가이드
- 주말에 아이 데리고 갔다가 완전히 반한 2026 국내 테마파크 TOP 5: 줄 서는 시간까지 계산해서 고름
태그: []
Leave a Reply